Tag “Python”

I have been asked to interview Python programmers for our team recently. And I gave them a task—implement dictionary-like structure Tree with the following features:

>>> t = Tree()
>>> t['a.x'] = 1
>>> t['a.y'] = 2
>>> t['b']['x'] = 3
>>> t['b']['y'] = 4
>>> t == {'a.x': 1, 'a.y': 2, 'b.x': 3, 'b.y': 4}
True
>>> t['a'] == {'x': 1, 'y': 2}
True
>>> list(t.keys())
['a.x', 'a.y', 'b.x', 'b.y']
>>> list(t['a'].keys())
['x', 'y']

“It’s quite simple task,” you may think at a glance. But it isn’t, in fact it’s tricky as hell. Any implementation has its own trade-offs and you can never claim that one implementation better another—it depends on context. There is also a lot of corner cases that have to be covered with tests. So I expected to discuss such tricks and trade-offs on the interview. I think, it is the best way to learn about interviewee problem solving skills.

However, there is one line of code that gives away bad solution.

class Tree(dict):

Inheritance from built-in dict type. Let’s see why you shouldn’t do that and what you should do instead.

Python dictionary interface has number of methods that seems to use one another. For example, reading methods:

>>> d = {'x': 1}
>>> d['x']
1
>>> d.get('x')
1
>>> d['y']          # ``__getitem__`` raises KeyError for undefined keys
Traceback (most recent call last):
  File "<stdin>", line 1, in <module>
KeyError: 'y'
>>> d.get('y')      # whereas ``get`` returns None
>>> d.get('y', 2)   # or default value passed as second argument
2

So you can expect that dict.get() method is implemented like this:

def get(self, key, default=None):
    try:
        return self[key]
    except KeyError:
        return default

And you can also expect that overriding dict.__getitem__() behavior you will override dict.get() behavior too. But it doesn’t work this way:

>>> class GhostDict(dict):
...     def __getitem__(self, key):
...         if key == 'ghost':
...             return 'Boo!'
...         return super().__getitem__(key)
...
>>> d = GhostDict()
>>> d['ghost']
'Boo!'
>>> d.get('ghost')  # returns None
>>>

It happens, because Python built-in dict is implemented on C and its methods are independent of one another. It is done for performance, I guess.

So what you really need is Mapping (read-only) or MutableMapping abstract base classes from collections.abc module. The classes provide full dictionary interface based on a handful of abstract methods you have to override and they work as expected.

>>> from collections.abc import Mapping
>>> class GhostDict(Mapping):
...     def __init__(self, *args, **kw):
...         self._storage = dict(*args, **kw)
...     def __getitem__(self, key):
...         if key == 'ghost':
...             return 'Boo!'
...         return self._storage[key]
...     def __iter__(self):
...         return iter(self._storage)    # ``ghost`` is invisible
...     def __len__(self):
...         return len(self._storage)
...
>>> d = GhostDict(x=1, y=2)
>>> d['ghost']
'Boo!'
>>> d.get('ghost')
'Boo!'
>>> d['x']
1
>>> list(d.keys())
['y', 'x']
>>> list(d.values())
[1, 2]
>>> len(d)
2

Type checking also works as expected:

>>> isinstance(GhostDict(), Mapping)
True
>>> isinstance(dict(), Mapping)
True

P.S. You can see my own implementation of the task in the sources of ConfigTree package. As I said above, it isn’t perfect, it’s just good enough for the context it is used in. And its tests... well, I have no idea what happens there now. I just don’t touch them.

If you develop applications that use untrusted input, you deal with validation. No matter which framework or library you are using. It is a common task. So I am going to share a recipe that neatly integrates validation layer with business logic one. It is not about what data to validate and how to validate they, it is mostly about how to make code looks better using Python decorators and magic methods.

Let’s say we have a class User with a method login.

class User(object):

    def login(self, username, password):
        ...

And we have a validation schema Credentials. I use Colander, but it does not matter. You can simply replace it by your favorite library:

import colander


class Credentials(colander.MappingSchema):

    username = colander.SchemaNode(
        colander.String(),
        validator=colander.Regex(r'^[a-z0-9\_\-\.]{1,20}$')
    )
    password = colander.SchemaNode(
        colander.String(),
        validator=colander.Length(min=1, max=100),
    )

Each time you call login with untrusted data, you have to validate the data using Credentials schema:

user = User()
schema = Credentials()

trusted_data = schema.deserialize(untrusted_data)
user.login(**trusted_data)

The excessive code is a trade-off for flexibility. Such methods are also can be called using trusted data. So we can’t just put validation into the method itself. However, we can bind the schema to the method without loss of flexibility.

Firstly, create validation package using the following structure:

myproject/
    __init__.py
    ...
    validation/
        __init__.py
        schema.py

Then add the following code into myproject/validation/__init__.py (again, usage of cached_property is inessential detail, you can use the same decorator provided by your favorite framework):

from cached_property import cached_property

from . import schema


def set_schema(schema_class):
    def decorator(method):
        method.__schema_class__ = schema_class
        return method
    return decorator


class Mixin(object):

    class Proxy(object):

        def __init__(self, context):
            self.context = context

        def __getattr__(self, name):
            method = getattr(self.context, name)
            schema = method.__schema_class__()

            def validated_method(params):
                params = schema.deserialize(params)
                return method(**params)

            validated_method.__name__ = 'validated_' + name
            setattr(self, name, validated_method)
            return validated_method

    @cached_property
    def validated(self):
        return self.Proxy(self)

There are three public objects: schema module, set_schema decorator, and Mixin class. The schema module is a container for all validation schemata. Place Credentials class into this module. The set_schema decorator simply adds passed validation schema to decorating method as __schema_class__ attribute. The Mixin class adds proxy object validated. The object provides access to the methods with __schema_class__ attribute and lazily creates their copies wrapped by validation routine. This is how it works:

from myproject import validation


class User(object, validation.Mixin):

    @validation.set_schema(validation.schema.Credentials)
    def login(self, username, password):
        ...

Now, we can call validated login method within a single line of code:

user = User()

user.validated.login(untrusted_data)

So what we get: the code is more compact; it is still flexible, i.e. we can call the method without validation; and it is more readable and self-documenting.

PasteDeploy is a great tool for managing WSGI applications. Unfortunately, there is no support of configuration formats other than INI-files. Montague is going to solve the problem, but its documentation is unfinished and says nothing useful. Hope, it will be changed soon. But if you don’t want to wait, as me do, the following recipe is for you.

Using ConfigTree on my current project, I stumbled with the problem: how to serve Pyramid applications (I got three ones) from the custom configuration? Here is how it looks like in YAML:

app:
    use: "egg:MyApp#main"
    # Application local settings goes here
filters:
    -
        use: "egg:MyFilter#filter1"
        # Filter local settings goes here
    -
        use: "egg:MyFilter#filter2"
server:
    use: "egg:MyServer#main"
    # Server local settings goes here

The easy way is to build INI-file and use it. The hard way is to make my own loader. I chose the hard one.

PasteDeploy provides public functions loadapp, loadfilter, and loadserver. However, these functions don’t work, because they don’t accept local settings. Only global configuration can be passed into.

app = loadapp('egg:MyApp#main', global_conf=config)

But the most of PasteDeploy-based applications simply ignore global_conf. For example, here is the paste factory of Waitress:

def serve_paste(app, global_conf, **kw):
    serve(app, **kw)        # global_conf? Who needs this shit?
    return 0

I dug around the sources of PasteDeploy and found loadcontext function. It is kind of low level private function. But who cares? So here is the source of loader, that uses the function.

from paste.deploy.loadwsgi import loadcontext, APP, FILTER, SERVER


def run(config):

    def load_object(object_type, conf):
        conf = conf.copy()
        spec = conf.pop('use')
        context = loadcontext(object_type, spec)    # Loading object
        context.local_conf = conf                   # Passing local settings
        return context.create()

    app = load_object(APP, config['app'])
    if 'filters' in config:
        for filter_conf in config['filters']:
            filter_app = load_object(FILTER, filter_conf)
            app = filter_app(app)
    server = load_object(SERVER, config['server'])
    server(app)

But it is not the end. Pyramid comes with its own command pserve, that uses PasteDeploy to load and start up application from INI-file. And there is an option of the command that makes development fun. I mean --reload one. It starts separate process with a file monitor that restarts your application when its sources are changed. The following code provides the feature. It depends on Pyramid, because I don’t want to reinvent the wheel. But if you use another framework, it won’t be hard to write your own file monitor.

import sys
import os
import signal
from subprocess import Popen

from paste.deploy.loadwsgi import loadcontext, APP, FILTER, SERVER
from pyramid.scripts.pserve import install_reloader, kill


def run(config, with_reloader=False):

    def load_object(object_type, conf):
        conf = conf.copy()
        spec = conf.pop('use')
        context = loadcontext(object_type, spec)
        context.local_conf = conf
        return context.create()

    def run_server():
        app = load_object(APP, config['app'])
        if 'filters' in config:
            for filter_conf in config['filters']:
                filter_app = load_object(FILTER, filter_conf)
                app = filter_app(app)
        server = load_object(SERVER, config['server'])
        server(app)

    if not with_reloader:
        run_server()
    elif os.environ.get('master_process_is_running'):
        # Pass your configuration files here using ``extra_files`` argument
        install_reloader(extra_files=None)
        run_server()
    else:
        print("Starting subprocess with file monitor")
        environ = os.environ.copy()
        environ['master_process_is_running'] = 'true'
        childproc = None
        try:
            while True:
                try:
                    childproc = Popen(sys.argv, env=environ)
                    exitcode = childproc.wait()
                    childproc = None
                    if exitcode != 3:
                        return exitcode
                finally:
                    if childproc is not None:
                        try:
                            kill(childproc.pid, signal.SIGTERM)
                        except (OSError, IOError):
                            pass
        except KeyboardInterrupt:
            pass

That’s it. Wrap the code with a console script and don’t forget to initialize the logging.

I have just released ConfigTree. It is the longest project of mine. It took more than two and a half years from the first commit to the release. But the history of the project is much longer.

The idea came from “My Health Experience” project. It was a great project I worked on, unfortunately it is closed now. My team started from a small forum and ended up with a full featured social network. We got a single server at the start and a couple of clusters at the end. A handful of configuration files grew up to a directory with dozens of ones, which described all subsystems in all possible environments. Each module of the project had dozens of calls to the configuration registry. And we developed a special tool to manage the settings.

This is how it worked. An environment name was a dot-separated string in format group.subgroup.environment. For instance, prod.cluster-1.server-1 was an environment name of the first server from the first cluster of the production environment; and dev.kr41 was the name of my development environment. The configuration directory contained a tree of subdirectories, where each of the subdirectory was named after a part of some environment name. For example:

config/
    prod/
        cluster-1/
            server-1/
    dev/
        kr41/

The most common configuration options were defined at the root of the tree, the most specific ones—at the leafs. For example, config/prod directory contained files with common production settings; config/prod/cluster-1—common settings for all servers of the first cluster; and config/prod/cluster-1/server-1—concrete settings for the first server. The files were merged by a loader on startup into a single mapping object using passed environment name. Some of the common settings were overridden by the concrete ones during the loading process. So that we did not use copy-paste in our configuration files. If there was an option for a number of environments, this option had been defined within group settings. There we also post-loading validation, that helped us to use safe defaults. For instance, when each server had to use its own cryptographic key, such key had been defined on the group level with an empty default value, which was required to be overridden. So that validator raised an exception on startup, when it had found this empty value in the result configuration. Because of this we never deployed our application on production with unsafe settings.

The tool was so useful, so when I started to use Python I had tried to find something similar. Yep, “My Health Experience” had been written on PHP, and it was the last PHP project I worked on. My search was unsuccessful, and I reinvented such tool working on each my project. So I eventually decided to rewrite and release it as an open-source project. And here it is.

I added some flexibility and extensibility to the original ideas. Each step of configuration loading process can be customized or replaced by your own implementation. It also comes with command line utility program, which can be used to build configuration as a single JSON file. So you can even use it within a non-Python project—JSON parser is all what you need. I hope, the tool is able to solve a lot of problems and can be useful for different kind of projects. Try it out and send me your feedback. As for me, I am going to integrate it into my current project right now.

Requests library is a de facto standard for handling HTTP in Python. Each time I have to write a crawler or REST API client, I know what to use. I have made a dozen of ones during the last couple of years. And each time I stumbled one frustrating thing. I mean requests.exceptions.ConnectionError which is unexpectedly raised with the message error(111, 'Connection refused') after 3–5 hours of client uptime, when remote service works well and stays available.

I don’t know for sure why it happens. I have a couple of versions, but essentially they all about unideal world we live in. Connection may die or hang. Highly loaded web server may refuse request. Packets may be lost. Long story short—shit happens. And when it happens, default Requests settings will not be enough.

So if you are going to make long-live process, which will use some services via Requests, you should change its default settings in this way:

from requests import Session
from requests.adapters import HTTPAdapter


session = Session()
session.mount('http://', HTTPAdapter(max_retries=5))
session.mount('https://', HTTPAdapter(max_retries=5))

HTTPAdapter performs only one try by default and raises ConnectionError on fail. I started from two tries, and empirically got that five ones gives 100% resistance against short-term downtimes.

I am not sure is it a bug or a feature of the Requests. But I never see that these default settings are changed in some Requests-based library like Twitter or Facebook API client. And I got such errors using these libraries too. So if you are using such library, examine its code. Now you know how to fix it. Thanks Python design, there are no true private members.

Unfortunately, I cannot reproduce this bug (if it is a real bug) in laboratorial conditions for now. So I will be grateful, if somebody suggests me how to.

I released GreenRocket library on October 2012. It is a dead simple implementation of Observer design pattern, which I use in almost all of my projects. I thought, there was nothing to improve. But my recent project heavily uses the library. And I get tired to write tests that checks signals. This is how them look like:

from nose import tools
# I use Nose for testing my code

from myproject import MySignal, some_func
# ``MySignal`` inherits ``greenrocket.Signal``
# ``some_func`` must fire ``MySignal`` as its side-effect


def test_some_func():
    log = []                    # Create log for fired signals

    @MySignal.subscribe         # Subscribe a dummy handler
    def handler(signal):
        log.append(signal)      # Put fired signal to the log

    some_func()                 # Call the function to test

    # Test fited signal from the log
    tools.eq_(len(log), 1)
    tools.eq_(log[0].x, 1)
    tools.eq_(log[0].y, 2)
    # ...and so on

There are four lines of utility code. And it is boring. So I added helper class Watchman to the library to make it testing friendly. This is how it works:

from greenrocket import Watchman

from myproject import MySignal, some_func


def test_some_code_that_fires_signal():
    watchman = Watchman(MySignal)           # Create a watchman for MySignal
    some_func()
    watchman.assert_fired_with(x=1, y=2)    # Test fired signal

Just one line of utility code and one line for actual test! I have already rewritten all of my tests. So if you are using the library, it’s time to upgrade. If you don’t, then try it out.

Traversal is awesome thing, I believe that it is real killer feature of Pyramid web framework. However people usually don’t get it. They think it is too complicated. So I’m going to convince you in the opposite.

I assume, you know that Pyramid supports two URL handling methods: URL Dispatch and Traversal. And you familiar with the technical details of how them work (follow the links above if you don’t). So here I’m considering the benefits of Traversal, instead of how it actually works.

Pyramid is super-flexible framework, where you can do thing in the way you want to. Traversal is not an exception. To start working with Traversal, you just need to provide a root_factory callable, which accepts single argument request and returns a root resource of your web application. The root can be arbitrary object. However, to feel all power of traversal the root_factory should return a resource tree—a hierarchy of objects, where each one provides the following features:

  • it knows its name, i.e. has __name__ attribute;

  • it knows its parent, i.e. has __parent__ attribute;

  • it knows its children, i.e. implements __getitem__ method in the following way:

    >>> root = root_factory(request)
    >>> child = root['child_resource']
    >>> child.__name__
    'child_resource'
    >>> child.__parent__ is root
    True
    

So that to build URL structure of your web site, you should build a resource tree—a bunch of classes, in fact. And that is exactly what usually confuses people. Is it overengineering? Why so complicated? Indeed, writing a dozen of routes will take exactly a dozen lines of code. Whereas writing a couple of classes will take much more ones.

However, the answer is “No”, it’s not overengineering. Traversal use resource tree for handling URLs, but the resource tree itself is not only used to represent URL structure. It is a perfect additional abstraction level which can encapsulate business logic. In that way the old holy war about fat models and skinny controllers (views in Pyramid terms) can be solved.

Resource also provides a unified interface between models and views. From one hand, you can build your models using different data sources: RDBMS, NoSQL, RPC, REST, and other terrifying abbreviations. And resources will make them work together. From other hand, you can use these resources in different interfaces: web (which Pyramid actually provides), RPC, CLI, even tests. Because test is just another interface of your application. And yes, using Traversal will make testing much more easier.

But what about URL structure? Using traversal is hard to start, you should build a resource tree. However these efforts will be rewarded in future. Because supporting traversal-based application is a walk in the park. For example, you have code that implements blog:

class Blog(Resource):

    def __getitem__(self, name):
        return BlogPost(name, parent=self)


class BlogPost(Resource):
    ...


@view_config(context=Blog)
def index(context, request):
    ...

@view_config(context=Blog, view_name='archive')
def archive(context, request):
    ...

@view_config(context=BlogPost)
def show(context, request):
    ...

Now, you can bind Blog resource to other ones, to add blogs into different places of your site. And it can be done with a couple of lines of code:

class User(Resource):

    def __getitem__(self, name):
        if name == 'blog':
            # Now each user has her own blog
            return Blog(name, parent=self)
        elif ...

From this point of view, resource with associated views can be considered as a reusable component, just like application in Django. You can also use mixin classes to create plugins:

class Commetable(object):
    """ Implements comment list """

class Likeable(object):
    """ Implements like/unlike buttons behavior """

class BlogPost(Resource, Commentable, Likeable):
    """ Blog post that can be commented and liked/unliked """

You can even make the trick, which I described in Obscene Python, i.e. constructing your resource classes on the fly using different set of mixins for each one.

And the last, but not least, Traversal is a right way for handling URLs, because it works with hierarchical structure which reflects URL. Whereas URL Dispatch uses flat list of regular expressions. So that, task like rendering breadcrumb navigation is trivial for traversal-based application, but it is hard as hell using URL Dispatch (in fact, it cannot be done without dirty hacks).

So if you are going to use Traversal, try also TraversalKit. This library is essential of my own experience of Traversal usage. I hope it will be useful for you too.

P.S. The article has been written in transfer zone of Moscow airport Domodedovo on my way from PyCon Finland 2014, Helsinki to Omsk.

When you develop a library, which should work with a number of Python versions, Tox is obvious choice. However, I start using it even in application developing, where single Python version is used. Because it helps me significantly reduce efforts of documentation writing. How? It transparently manages virtual environments.

For instance, you work on backend, and your colleague works on frontend. This guy is CSS ninja, but knows nothing about Python. So you have to explain him or her how to start the application in development mode. You can do this in two ways.

The first one is to write an instruction. The instruction should explain how to setup virtual environment, activate it, setup application in development mode, and run it. In 9 cases of 10 it blows non-pythonista’s mind away. Moreover, writing docs is tedious. Who likes writing docs, when you can write a script?!

And this is the second way. You can write a script, which creates virtual environment, activates it, installs application, and runs it. But this is exactly what Tox does.

Here is how I do it. The following tox.ini file is from the project I am working on now. It is a Pyramid application, which I test against Python 3.3 and 3.4, but develop using Python 3.4.

[tox]
envlist=py33,py34

[testenv]
deps=
    -r{toxinidir}/tests/requires.txt
    flake8
commands=
    nosetests
    flake8 application
    flake8 tests

[testenv:dev]
envdir=devenv
basepython=python3.4
usedevelop=True
deps=
    -r{toxinidir}/tests/requires.txt
    waitress
commands={toxinidir}/scripts/devenv.sh {posargs}

Take a notice on the section [testenv:dev]. It launches devenv.sh script passing command line arguments, which are not processed by Tox itself. Here is the script:

#!/bin/bash

test() {
    nosetests "$@"
}

serve() {
    pserve --reload "configs/development.ini"
}

cmd="$1"
shift

if [[ -n "$cmd" ]]
then
    $cmd "$@"
fi

And here is an example of the manual:

  1. Install Tox.

  2. To run application use:

    $ tox -e dev serve
    
  3. To run all tests using development environment:

    $ tox -e dev test
    
  1. To run single test using development environment:

    $ tox -e dev test path/to/test.py
    
  2. To run complete test suite and code linting:

    $ tox
    

That’s it. Pretty simple. I copy it from project to project and my teammates are happy. You can even eliminate the first item from the list above, using Vagrant and installing Tox on provision stage. But there is a bug in Distutils, which breaks Tox within Vagrant. Use this hack to make it work.

It is always easy and fun to do something, if you have right tools. Writing tests is not exception. Here is my toolbox, all things at one place. I hope, the following text will save somebody’s time and Google’s bandwidth.

Here we go.

Flake8

It is a meta tool, which tests code using PyFlakes and pep8. The first one is a static analyzer and the second one is a code style checker. They can be used separately, but I prefer they work as a team. It helps to find stupid errors such as unused variables or imports, typos in names, undefined variables, and so on. It also helps to keep code consistent according to PEP 8 Style Guide for Python Code, which is critical for code-style nazis like me. The usage is quite simple:

$ flake8 coolproject
coolproject/module.py:97:1: F401 'shutil' imported but unused
coolproject/module.py:625:17: E225 missing whitespace around operato
coolproject/module.py:729:1: F811 redefinition of function 'readlines' from line 723
coolproject/module.py:1028:1: F841 local variable 'errors' is assigned to but never used

Additionally, Flake8 includes complexity checker, but I never use it. However, it can help to decrease WTFs per minute during code review, I guess.

Nose

It is a unit-test framework, an extension of traditional unittest. I never use the last one itself, so I cannot adequately compare it with Nose. However, at a glance, Nose-based tests is more readable and compact. But it is only my subjective opinion.

Another benefit of Nose is its plugins. Some of them I use from time to time, but there are two, which I use unconditionally on each my project: doctest and cover.

The doctest plugin collects test scenarios from source code doc-strings and run them using Doctest library. It helps to keep doc-strings consistent with the code they describe. It also good place for unit tests for simple functions and classes. If test cases are not too complex, it will be enough to cover the code directly in the doc-string.

The cover plugin calculates test coverage and generates reports like this one:

Name                      Stmts   Miss  Cover   Missing
-------------------------------------------------------
coolproject                  20      4    80%   33-35, 39
coolproject.module           56      6    89%   17-23
-------------------------------------------------------
TOTAL                        76     10    87%

Such reports help to check test cases themselves and significantly improve the quality of ones. The cover plugin uses Coverage tool behind the scene, so you have to manually install it.

Nose is perfectly integrated with Setuptools. By the way, that is another reason to use the last one. I prefer to store Nose settings in the setup.cfg file, which usually looks like this:

[nosetests]
verbosity=2
with-doctest=1
with-coverage=1
cover-package=coolproject
cover-erase=1

It makes Nose usage very simple:

$ nosetests
tests.test1 ... ok
tests.test2 ... ok
tests.test3 ... ok
Doctest: coolproject.function1 ... ok
Doctest: coolproject.module.function2 ... ok

Name                      Stmts   Miss  Cover   Missing
-------------------------------------------------------
coolproject                  20      4    80%   33-35, 39
coolproject.module           56      6    89%   17-23
-------------------------------------------------------
TOTAL                        76     10    87%
Ran 5 tests in 0.021s

OK

Mocks

There is no way to write tests without mocks. At the most cases, Mock library is all what you need. However, there are other useful libraries, that can be helpful in particular cases.

  • Venusian can help to mock decorated functions deferring decorator action on the separate step.
  • FreezeGun is a neat mock for date and time. There is nothing you cannot do using Mock library, but it has already been done. So, just use it.
  • Responses is a mock for Requests library. If you develop client for third-party REST-service using Requests, that is what you need.

Additionally, I strongly recommend to look over the perfect article Python Mock Gotchas by Alex Marandon.

Tox

Tox gets things together and makes them run against different Python versions. It is like a command center for all testing infrastructure. It automatically creates virtual environments for specified Python versions, installs test dependencies and runs tests. And all of these is done using single command tox.

For example, tox.ini described bellow sets up testing for Python 3.3, 3.4, and PyPy, using Nose for unit tests and Flake8 for static analysis of source code of project itself, as well as source code of unit tests.

[tox]
envlist=py33,py34,pypy

[testenv]
deps=
    nose
    coverage
    flake8
commands=
    nosetests
    flake8 coolproject
    flake8 tests

The usage of this tool is not limited by tests only. But it deserves a separate article, so I will write it soon.

Conclusion

I am pretty sure the list above is not complete. And there is a lot of awesome testing libraries that make life easier. So, post your links in the comments. I will try to keep the article updated.

Since I started developing in Python, I use Setuptools in each of my projects. So I was sure that this approach is obvious and nobody needs an explanation what benefits it brings. I think, it happened because the first thing I’ve learned was Pylons web framework. There was no other way developing project rather than using Setuptools. However I was wondered to know how much people develop applications without packaging and get troubles, which already solved in Setuptools.

Let’s consider a typical application. It usually consists of single package that includes a number of modules and subpackages:

MyProject/                  # a project folder
    myproject/              # a root package of the project
        subpackage/
            __init__.py
            module3.py
            module4.py
        __init__.py
        module1.py
        module2.py

If you are going to use Setuptools, you have to add at least a single file at the project folder—setup.py with the following contents:

from setuptools import setup

setup(
    name='MyProject',
    version='0.1',
    description='42',
    long_description='Forty two',
    author='John Doe',
    author_email='jdoe@example.com',
    url='http://example.com',
    license='WTFPL',
    packages=['myproject'],
)

This script adds metadata to the project and tells Python how to install it. For example the following command installs project into Python site-packages:

$ python setup.py install

...and this one installs it in development mode, i.e. creates a link to the code instead of copy it:

$ python setup.py develop

If you ever developed a library and published it on PyPI the code above should be familiar to you. So I’m not going to discuss why do you need Setuptools in library development process. What I’m going to consider is why do you need Setuptools in application development. For example you develop a web site. It should work on your local development environment and production one. You are not going to distribute it via PyPI. So why do you need to add extra steps of deployment—packaging and installation? What issues Setuptools can solve?

Mess with import path

Each application has at least one main module. This module is usually executable script or contains a special object, which will be used by third-party applications. For example, uWSGI application server requires a module with a callable object application which will be served by uWSGI. Obviously, this module should import another ones from the project. Because of this, it usually contains dirty hacks around sys.path. For example, if module1.py from the example above is executable, it might contain the following patch:

#!/usr/bin/python

import os
import sys

# Makes ``myproject`` package discoverable by Python
# adding its parent directory to import path
root = os.path.dirname(os.path.dirname(os.path.abspath(__file__)))
sys.path = [root] + sys.path

from myproject import module2

And the relative import just doesn’t work:

from . import module2
# You will get
# ValueError: Attempted relative import in non-package

When your application is installed into Python site-packages using Setuptools, you will never have the problems with importing modules. Any import relative or absolute just works. And completely no hacks.

Executable scripts

There is one more trouble with executable scripts. You will have to specify a path when you call it:

$ /path/to/myproject/dosomething.py

...or create a symlink to /usr/bin

$ sudo ln -s /path/to/myproject/dosomething.py /usr/bin/dosomething
$ dosomething

Setuptools automate this routine. You just need to add a special entry point into setup() function:

setup(
    # ...
    entry_points="""
    [console_scripts]
    dosomething = myproject.module1:dosomething
    """,
)

It creates a console script dosomething that will call dosomething() function from module myproject.module1 each time the script is executed. And this feature even works in the virtual environment. As soon as you activate virtual environment, each executable script will be available at console.

Entry points

Entry points are not limited by creating console scripts. It is a powerful feature with a lot of use cases. In a nutshell, it helps packages to communicate each other. For example, an application can scan packages for a special entry point and use them as plugins.

Entry points are usually described using ini-file syntax. Where section name is entry point group name, key is entry point name, and value is Python path to target object, i.e.:

[group_name]
entry_point_name = package.module:object

For instance, application can discover entry points from group myproject.plugins to load plugins defined in separate packages:

import pkg_resources

plugins = {}
for entry_point in pkg_resources.iter_entry_points('myproject.plugin'):
    plugins[entry_point.name] = entry_point.load()

Another use case is to make your application pluggable. For example, the common way to deploy Pyramid applications is using PasteDeploy-compatible entry points, which return WSGI application factory:

[paste.app_factory]
main = myproject.wsgi:get_application

Requirements and wheels

You can also specify application requirements in the setup() function:

setup(
    # ...
    install_requires=['Pyramid', 'lxml', 'requests'],
)

The third-party packages will be downloaded from PyPI each time you install the application. Additionally you can use wheels. It helps to speedup installation process dramatically and also freeze versions of third-party packages. Make sure you are using latest version of Setuptools, Pip and Wheel:

$ pip intall -U pip setuptools wheel

Then pack your application with its dependencies into wheelhouse directory using the following script:

#!/bin/bash

APPLICATION="MyProject"
WHEELHOUSE="wheelhouse"
REQUIREMENTS="${APPLICATION}.egg-info/requires.txt"

python setup.py bdist_wheel

mkdir -p "${WHEELHOUSE}"
pip wheel \
    --use-wheel \
    --wheel-dir "${WHEELHOUSE}" \
    --find-links "${WHEELHOUSE}" \
    --requirement "${REQUIREMENTS}"

cp dist/*.whl "${WHEELHOUSE}/"

Now, you can copy wheelhouse directory to any machine and install your application even without an Internet connection:

$ pip install --use-wheel --no-index --find-links=wheelhouse MyProject

Want more?

The features described above are not only available ones. A lot of other cool things you can find in the official documentation. I hope I've awoken your interest.

What is coroutine? Complete explanation you can find in David Beazley’s presentation—“A Curious Course on Coroutines and Concurrency.” Here is my rough one. It is a generator which consumes values instead of emits ones.

>>> def gen():  # Regular generator
...     yield 1
...     yield 2
...     yield 3
...
>>> g = gen()
>>> g.next()
1
>>> g.next()
2
>>> g.next()
3
>>> g.next()
Traceback (most recent call last):
  File "<stdin>", line 1, in <module>
StopIteration
>>> def cor():  # Coroutine
...     while True:
...         i = yield
...         print '%s consumed' % i
...
>>> c = cor()
>>> c.next()
>>> c.send(1)
1 consumed
>>> c.send(2)
2 consumed
>>> c.send(3)
3 consumed

As you can see yield statement can be used with assignment to consume values from outer code. An obviously named method send is used to send value to coroutine. Additionally coroutine should be “activated” by calling next method (or __next__ in Python 3.x). Since coroutine activation may be annoying, the following decorator is usually used for this purposes.

>>> def coroutine(f):
...     def wrapper(*args, **kw):
...         c = f(*args, **kw)
...         c.send(None)    # This is the same as calling ``next()``,
...                         # but works in Python 2.x and 3.x
...         return c
...     return wrapper

If you need to shutdown coroutine, use close method. Calling it will raise an exception GeneratorExit inside coroutine. It will raise also, when coroutine is destroyed by garbage collector.

>>> @coroutine
... def worker():
...     try:
...         while True:
...             i = yield
...             print "Working on %s" % i
...     except GeneratorExit:
...         print "Shutdown"
...
>>> w = worker()
>>> w.send(1)
Working on 1
>>> w.send(2)
Working on 2
>>> w.close()
Shutdown
>>> w.send(3)
Traceback (most recent call last):
  File "<stdin>", line 1, in <module>
StopIteration
>>> w = worker()
>>> del w  # BTW, it will not be passed in PyPy. You should explicitly call ``gc.collect()``
Shutdown

This exception cannot be “swallowed”, because it will cause of RuntimeError exception. Catching it should be used for freeing resources only.

>>> @coroutine
... def bad_worker():
...     while True:
...         try:
...             i = yield
...             print "Working on %s" % i
...         except GeneratorExit:
...             print "Do not disturb me!"
...
>>> w = bad_worker()
>>> w.send(1)
Working on 1
>>> w.close()
Do not disturb me!
Traceback (most recent call last):
  File "<stdin>", line 1, in <module>
RuntimeError: generator ignored GeneratorExit

That is all what you need to know about coroutines to start using them. Let’s see what benefits they give. In my opinion, a single coroutine is useless. The true power of coroutines comes when they are used in pipelines. A simple abstract example: filter out even numbers from input source, then multiply each number on 2, then add 1.

>>> @coroutine
... def apply(op, next=None):
...     while True:
...         i = yield
...         i = op(i)
...         if next:
...             next.send(i)
...
>>> @coroutine
... def filter(cond, next=None):
...     while True:
...         i = yield
...         if cond(i) and next:
...             next.send(i)
...
>>> result = []
>>> pipeline = filter(lambda x: not x % 2, \
...            apply(lambda x: x * 2, \
...            apply(lambda x: x + 1, \
...            apply(result.append))))
>>> for i in range(10):
...     pipeline.send(i)
...
>>> result
[1, 5, 9, 13, 17]

Schema of pipeline

Schema of pipeline

But the same pipeline can be implemented using generators:

>>> def apply(op, source):
...     for i in source:
...         yield op(i)
...
>>> def filter(cond, source):
...     for i in source:
...         if cond(i):
...             yield i
...
>>> result = [i for i in \
...     apply(lambda x: x + 1, \
...     apply(lambda x: x * 2, \
...     filter(lambda x: not x % 2, range(10))))]
>>> result
[1, 5, 9, 13, 17]

So what the difference between coroutines and generators? The difference is that generators can be connected in straight pipeline only, i.e. single input—single output. Whereas coroutines may have multiple outputs. Thus they can be connected in really complicated forked pipelines. For example, filter coroutine could be implemented in this way:

>>> @coroutine
... def filter(cond, ontrue=None, onfalse=None):
...     while True:
...         i = yield
...         next = ontrue if cond(i) else onfalse
...         if next:
...             next.send(i)
...

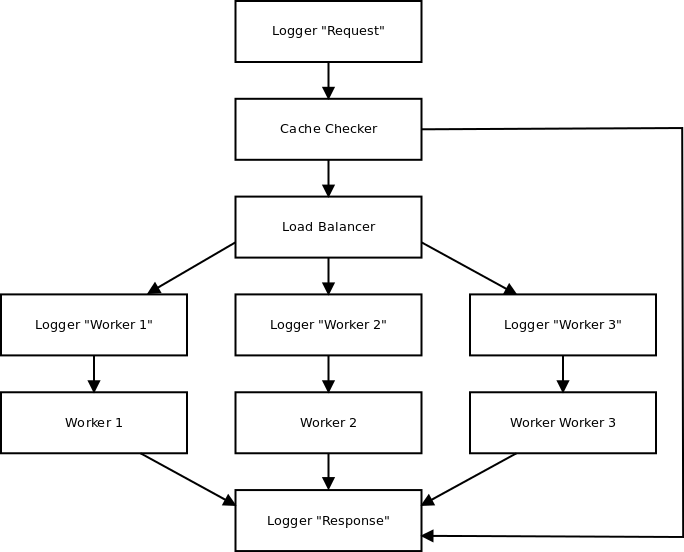
But let’s see an another example. Here is the mock of distributed computing system with cache, load balancer, and three workers.

def coroutine(f):
    def wrapper(*arg, **kw):
        c = f(*arg, **kw)
        c.send(None)
        return c
    return wrapper


@coroutine
def logger(prefix="", next=None):
    while True:
        message = yield
        print("{0}: {1}".format(prefix, message))
        if next:
            next.send(message)


@coroutine
def cache_checker(cache, onsuccess=None, onfail=None):
    while True:
        request = yield
        if request in cache and onsuccess:
            onsuccess.send(cache[request])
        elif onfail:
            onfail.send(request)


@coroutine
def load_balancer(*workers):
    while True:
        for worker in workers:
            request = yield
            worker.send(request)


@coroutine
def worker(cache, response, next=None):
    while True:
        request = yield
        cache[request] = response
        if next:
            next.send(response)


cache = {}
response_logger = logger("Response")
cluster = load_balancer(
    logger("Worker 1", worker(cache, 1, response_logger)),
    logger("Worker 2", worker(cache, 2, response_logger)),
    logger("Worker 3", worker(cache, 3, response_logger)),
)
cluster = cache_checker(cache, response_logger, cluster)
cluster = logger("Request", cluster)


if __name__ == "__main__":
    from random import randint


    for i in range(20):
        cluster.send(randint(1, 5))

Schema of the mock

Distributed computing system mock

To start love coroutines try to implement the same system without them. Of course, you can implement some classes to store state in the attributes and do work using send method:

class worker(object):

    def __init__(self, cache, response, next=None):
        self.cache = cache
        self.response = response
        self.next = next

    def send(self, request):
        self.cache[request] = self.response
        if self.next:
            self.next.send(self.response)

But I dare you to find a beautiful implementation for load balancer in this way!

I hope I persuaded you that coroutines are cool. So if you are going to try them, take a look at my library—CoPipes. It will be helpful to build really big and complicated data processing pipelines. Your feedback is desired.

After I had published my previous article, I got some feedback from my colleagues. And there was a simple (at first glance) but interesting question, that I am going to discuss. Why do I use __init__ method in my metaclass? Will __new__ one be more pythonic?

Indeed, all articles I have ever read describe metaclasses using __new__ method in their examples. Frankly, I used it too in the previous version of GreenRocket library. It was cargo cult. And I postponed publishing, before I had fixed that.

Nevertheless, the main goal of the previous article was to show, that we can use classes as regular objects. And it seems to be achieved. But metaclasses mechanism is not limited by this use case only. Python documentation says about it: “The potential uses for metaclasses are boundless. Some ideas that have been explored include logging, interface checking, automatic delegation, automatic property creation, proxies, frameworks, and automatic resource locking/synchronization.” So you really need the power of __new__ method sometimes:

>>> class Meta(type):
...     def __new__(meta, name, bases, attrs):
...         filtered_bases = []
...         for base in bases:
...             if isinstance(base, type):
...                 filtered_bases.append(base)
...             else:
...                 print(base)
...         return type.__new__(meta, name, tuple(filtered_bases), attrs)
...
>>> class Test(object, 'WTF!?', 'There are strings in bases!'):
...     __metaclass__ = Meta
...
WTF!?
There are strings in bases!
>>> Test.__mro__
(<class '__main__.Test'>, <type 'object'>)

However, I am pretty sure, that you have to avoid __new__ as much as you can. Because it significantly decreases flexibility. For example, what happens if you inherit a new class from another two with two different metaclasses?

>>> class AMeta(type): pass
...
>>> class BMeta(type): pass
...
>>> class A(object): __metaclass__ = AMeta
...
>>> class B(object): __metaclass__ = BMeta
...
>>> class C(A, B): pass
...
Traceback (most recent call last):
  File "<stdin>", line 1, in <module>
TypeError: Error when calling the metaclass bases
    metaclass conflict: the metaclass of a derived class must be a (non-strict) subclass of the metaclasses of all its bases

As you can see, you get a conflict. You have to create a new metaclass based on both existing ones:

>>> class CMeta(AMeta, BMeta): pass
...
>>> class C(A, B): __metaclass__ = CMeta
...

If these two metaclasses define just __init__ method, it will be simple:

>>> class CMeta(AMeta, Bmeta):
...     def __init__(cls, name, bases, attrs):
...         Ameta.__init__(cls, name, bases, attrs)
...         Bmeta.__init__(cls, name, bases, attrs)

But if both of them define __new__ one, a walk in the park will turn to run through the hell. And this is not a hypothetical example. Try to mix in collections.Mapping to a model declaration class based on your favorite ORM. I got such task on my previous project.

In conclusion. Use __new__ method only if you are going to do something, which is unfeasible in __init__ one. And think twice, before copying code from examples. Even if the examples are from official documentation.

Every article about Python metaclasses contains a quotation (yep, this one is not exception) by Tim Peters: “Metaclasses are deeper magic than 99% of users should ever worry about. If you wonder whether you need them, you don’t (the people who actually need them know with certainty that they need them, and don’t need an explanation about why).” I completely disagree with this saying. Why? Because I hate magic. Moreover, I hate when something is explained using magic. Metaclasses are regular tools, and they are very useful in some cases. What cases? Let’s see.

As you know, classes in Python are full-featured objects. As any object, they are constructed using classes. Thus, the class which is used for constructing another class is called metaclass. By default, type is used in this role.

>>> class SomeClass(object):
...     pass
...
>>> SomeClass.__class__
<type 'type'>

When you need to get a custom metaclass, you should inherit it from type. Just like a regular class inherits object:

>>> class SomeMetaClass(type):
...     pass
...
>>> class AnotherClass(object):                            # Python 2.x syntax
...     __metaclass__ = SomeMetaClass
...
>>> class AnotherClass(object, metaclass=SomeMetaClass):   # Python 3.x syntax
...     pass
...
>>> AnotherClass.__class__
<class '__main__.SomeMetaClass'>

The syntax shown above usually confuses newbies. Because the magic is still there. Okay, forget about metaclasses. Let’s think about objects:

>>> obj = SomeClass()

What happens in this single line of code? We just create a new object of class SomeClass and assign the reference of this object to a variable obj. Clear. Let’s go on.

>>> AnotherClass = SomeMetaClass('AnotherClass', (object,), {})

And what is there? Exactly the same thing, but we create a class instead of a regular object. This is what happens in the magic syntax. The interpreter parses syntactic sugar of class declaration and executes it as shown above. The first parameter passed into metaclass call is a class name (it will be available under AnotherClass.__name__ attribute). The second one is a tuple of parent (or base) classes. And the third one is a body of class—its attributes and methods (it will accessible via AnotherClass.__dict__).

If you work with JavaScript, it should be familiar for you. There are no classes in JavaScript. Therefore, when you emulate them, you will have to call a factory function. The function returns an object, which will be used later as a class. Python metaclass works in the same but more convenient way.

The last question is why do we need this feature? Is simple inheritance not enough? Well, an example is the best explanation. Let’s take a look on GreenRocket library (hmm... implicit advertisement). Don’t worry, it is not about rocket science. It is a simple implementation of Observer design pattern. There are about 150 lines of code 70 of which are doc-strings.

You create a class of signals:

>>> from greenrocket import Signal
>>> class MySignal(Signal):
...     pass
...

Subscribe a handler on it:

>>> @MySignal.subscribe
... def handler(signal):
...     print('handler: ' + repr(signal))
...

Then create and fire a signal:

>>> MySignal().fire()
handler: MySignal()

...and the handler is called. Here is the body of subscribe method:

@classmethod
def subscribe(cls, handler):
    """ Subscribe handler to signal.  May be used as decorator """
    cls.logger.debug('Subscribe %r on %r', handler, cls)
    cls.__handlers__.add(handler)
    return handler

Look at cls.__handlers__ attribute. The library logic is based on the fact, that each signal class must have this attribute. If there had been no metaclasses in Python, the library would require explicit declaration of one in the following way:

>>> class MySignal(Signal):
...     __handlers__ = WeakSet()
...

But it is stupid copy-paste work. In addition, this is a bug prone solution:

>>> class MySecondSignal(MySignal):
...     pass
...

If user misses __handler__ attribute, MySecondSignal will actually use handlers of MySignal. Good luck in debug! That is why we need a metaclass there, it just does this work for us:

class SignalMeta(type):
    """ Signal Meta Class """

    def __init__(cls, class_name, bases, attrs):
        cls.__handlers__ = WeakSet()

As you can see, there is no magic. Of course, there are still some corner cases, which are not explained in the article. But I hope, it will be useful as a quick start for understanding of Python metaclasses.

In my opinion, there are three levels of learning a language. First of all, you learn basic grammar and vocabulary. Then you learn specific things such as idioms and advanced constructions. And finally, you learn obscene language. It is very personal, where and when to use the latter. But we cannot deny the fact that swearing makes speech more expressive.

The swearwords in programming languages are called “dirty hacks”. Usually, it is strongly recommended to avoid them. However, hacking sometimes makes program better. Let’s take a look at some obscene Python.

>>> class A: pass
...
>>> class B: pass
...
>>> a = A()
>>> isinstance(a, A)
True
>>> a.__class__ = B
>>> isinstance(a, A)
False
>>> isinstance(a, B)
True

Well, you would think: “If someone from my team used this feature, I would commit a murder.” Frankly, it is not a feature. It is hard to believe, that Guido van Rossum and other Python developers were thinking about it: “We definitely need an ability to change object’s class in runtime.” It is rather a side effect of Python design. Anyway, I’m going to change your mind about this hack.

Imagine a CSM, where each page is described by regular Python dictionary object (it is stored in MongoDB, for example). So, you need a way to map these objects to some more useful ones. Obviously, each page has at least title and body:

class Page(object):
    """ A base class for representing pages """

    def __init__(self, data):
        self.title = data['title']
        self.body = data['body']

Also, page may have a number of additional widgets, which can be represented by mixins:

class Commentable(object):
    """ Adds comments on Page """

    def get_comments(self, page_num=1):
        """ Get list of comments for specified page number """

    def add_comment(self, user, comment):
        """ User comments Page """

    def remove_comment(self, comment_id):
        """ Moderator or comment author removes comment from Page """


class Likeable(object):
    """ Adds "like/dislike" buttons on Page """

    def like(self, user):
        """ User likes Page """

    def dislike(self, user):
        """ User dislikes Page """


class Favoritable(object):
    """ Adds "favorite" button on Page """

    def add_to_favorites(self, user):
        """ User adds Page to favorites """

    def remove_from_favorites(self, user):
        """ User removes Page from favorites """

The problem is how to get them together. A classical solution from “Design Patterns” by Gang of Four is a factory. It may be an additional class or function which takes a page descriptor dictionary, extracts mixin set, builds class based on Page and specified mixins, and returns an object of this class. But why do we need this additional entity? Let’s do it inside Page class directly:

class Page(object):
    """ A base class for representing pages """

    mixins = {}     # a map of registered mixins
    classes = {}    # a map of classes for each mixin combination

    @classmethod
    def mixin(cls, class_):
        """ Decorator registers mixin class """
        cls.mixins[class_.__name__] = class_
        return class_

    @classmethod
    def get_class(cls, mixin_set):
        """ Returns class for given mixin combination """
        mixin_set = tuple(mixin_set)    # Turn list into hashable type
        if mixin_set not in cls.classes:
            # Build new class, if it doesn't exist
            bases = [cls.mixins[class_name] for class_name in mixin_set]
            bases.append(Page)
            name = ''.join(class_.__name__ for class_ in bases)
            cls.classes[mixin_set] = type(name, tuple(bases), {})
        return cls.classes[mixin_set]

    def __init__(self, data):
        self.title = data['title']
        self.body = data['body']
        self.__class__ = self.get_class(data['mixins'])    # Fu^WHack you!!!

...register our mixins:

@Page.mixin
class Commentable(object):
    """ Adds comments on Page """


@Page.mixin
class Likeable(object):
    """ Adds "like/dislike" buttons on Page """


@Page.mixin
class Favoritable(object):
    """ Adds "favorite" button on Page """

...and test it:

somepage = Page({
    'title': 'Lorem Ipsum',
    'body': 'Lorem ipsum dolor sit amet, consectetur adipiscing elit.',
    'mixins': ['Commentable', 'Likeable'],
})

assert somepage.__class__.__name__ == 'CommentableLikeablePage'
assert isinstance(somepage, Commentable)
assert isinstance(somepage, Likeable)
assert isinstance(somepage, Page)

See full source of example.

So what did we get? We got a beautiful solution based on a questionable feature. This is exactly the same situation when using bad words makes speech better. Do you agree? No? Hack you!

P.S. If you combine this with Pyramid traversal, you will get a super flexible and powerful CMS. But this is another story.